
Facebook is currently the world’s most popular social media platform used by businesses of all shapes and sizes. Facebook Pages help your brand to promote and share its value-add, as well as to assist in customer support.
According to research, about 74% of Facebook users say that they visit the website daily, with around half (51%) saying they do multiple times a day.
Facebook clearly isn’t going anywhere anytime soon.
So, you should continue to make this platform a part of your overall marketing strategy to reach your target audience. Use this comprehensive guide to ensure you’ve set up your business page correctly, and optimized all areas of Facebook to get the best results!
The Basics of Facebook Marketing
While Facebook is free, your Facebook Page is not a substitute for your own site. A website is the only place online where you can actually control your message. Facebook Page rather serves as a micro-website within the platform which complements and highlights glimpses of your business.
Capturing brand name in social media platforms like Facebook will help get your name out there since social media profiles are usually the top rankings in the SERPs.
It’s also crucial to keep SEO strategies in mind when creating and optimizing your Facebook business page. Besides SEO and speed optimization, adding necessary business keywords should be incorporated throughout your Facebook page and post updates.
Creating And Optimizing Your Facebook Business Page
Step 1: Build Your Page
When building a page, it’s necessary to choose the right type of Facebook page straight away. You can choose from:
- Business or brand
- Community or public figure

Setting it up properly at the beginning will improve the way you communicate the message you want to display. Once you’ve chosen the right type of page, click “Get Started.”
Next, complete the basic details of your brand:
- Page Name
- Category
- Address

Choose the most appropriate category for your brand (you can change it in the future). You can also add a business phone number if you want. Click “Continue” to go the next step.
Step 2: Add a Profile Photo
Facebook will now prompt you to add a profile picture.
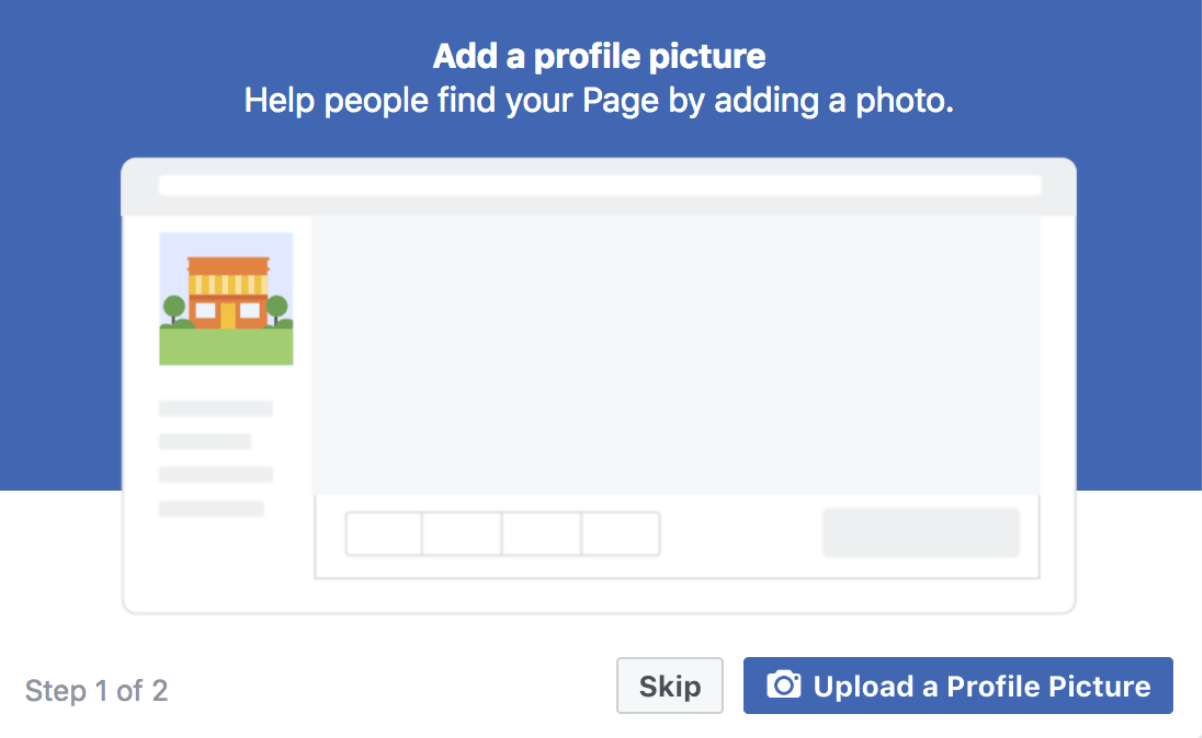
Most brands use their logo as a profile photo. If you don’t have a great logo, make sure to hire a professional designer or freelancer to create one.
Remember, the ideal Facebook profile photo size is 360 x 360 pixels (it must be at least 180 x 180 px).
Step 3: Add a Cover Picture
Let’s add a cover photo for your page.

Your cover photo is the first thing most visitors will notice. Thus, it’s best to select an image or video that conveys your brand personality and key value proposition immediately. Click “Add a Cover” and select the “Upload photo/video” option.

Remember, cover art displays at 820 x 312 px on PCs, and 640 x 360 px on mobile devices, while videos should be between 20 and 90 seconds long.
Step 4: Define the Key Aspects of Your Business Page
You’ve successfully created a Facebook Business Page! You’ll now see links to different Page management areas at the top of your page:
- Page: The link back to your current location.
- Inbox: This is where you manage your conversations with others.
- Notifications: A summary of your Facebook Page’s interactions.
- Insights: This is where you track Page metrics.
- Publishing Tools: Here, you can schedule new posts and review previous performances.
Promotions: You can manage and track your Facebook Ad campaigns here.

Step 5: Learn How to Login to Your Page
To navigate back to your profile, click your name or profile photo in the top blue bar. Now, whenever you’re on Facebook, you can access your Business Page admin by hitting the drop-down arrow button in the to right corner of your screen.

This will then bring up the list of Pages you have. Simply click on the one you want to use!
Step 6: View Your Page Settings
Since you’re already familiar with your new business page, let’s check out the Settings!

As you can see in the screenshot below, Facebook provides you with a bunch of options:
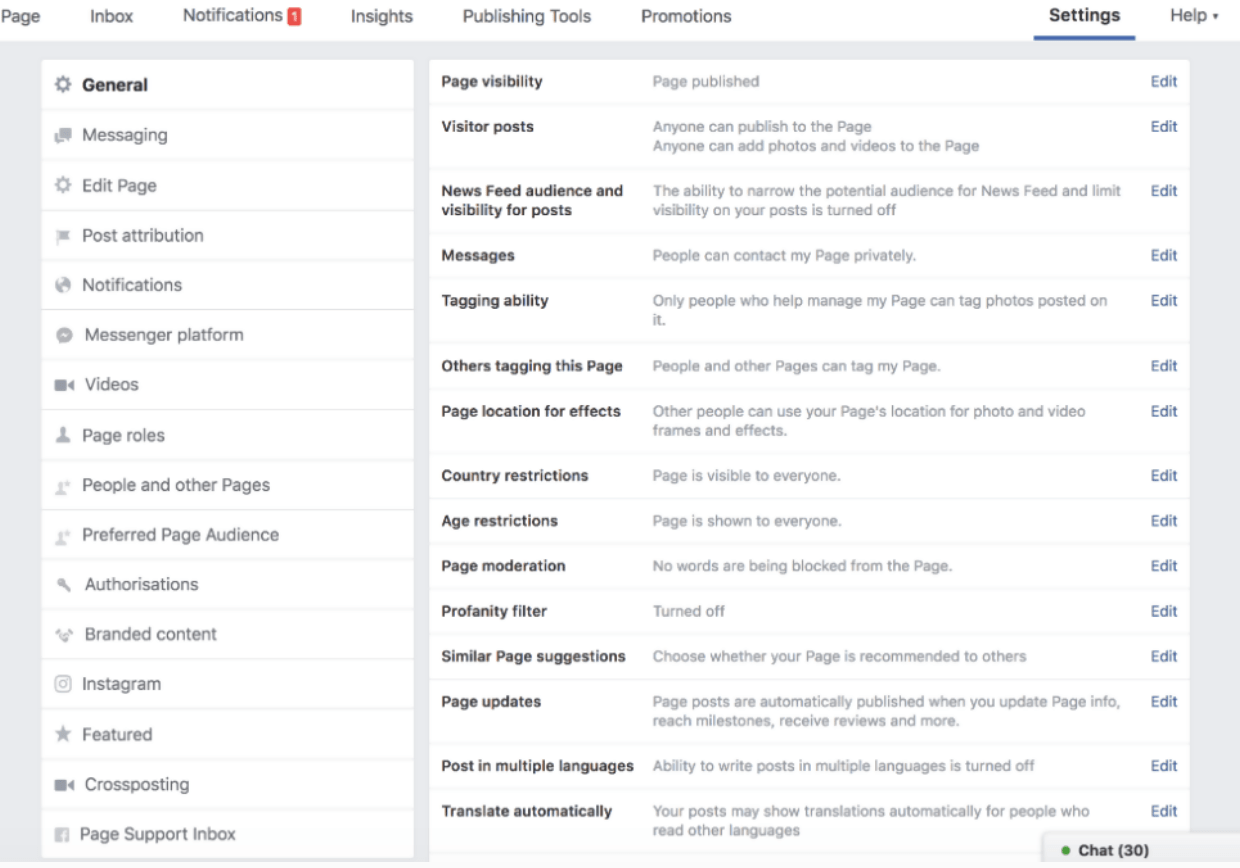
Luckily, these settings are very straightforward. In fact, you can leave most of them just as they are. But for now, change anything that seems relevant to your business.
For instance, if you’re selling children’s toys, you might want to turn on the profanity filter. Or, perhaps you have an international audience base, in which case you’d want to allow writing posts in multiple languages.
Step 7: Add and Edit Page Roles
If you want your team members to manage your Business Page, you can add them to the settings. Click “Page roles” from the sidebar on your left, then type in their email address or name to locate them.

Next, use the drop-down menu to choose from 5 different roles:
- Admin
- Editor
- Moderator
- Advertiser
- Analyst
Each role lets Page managers access and use certain features. Just read the description under the bar to understand the differences.
Step 8: Change Your Page Template
Facebook offers 10 different templates for your business page. Each one is tailored to best suit the requirements of different individuals and organizations.
These templates include Standard page, Business, Movies, Venues, Politicians, Charity, Restaurants and cafes, Services, Shopping, and Video page.
To access them, click “Edit Page” and look underneath the “Templates” section, then click “Edit.”
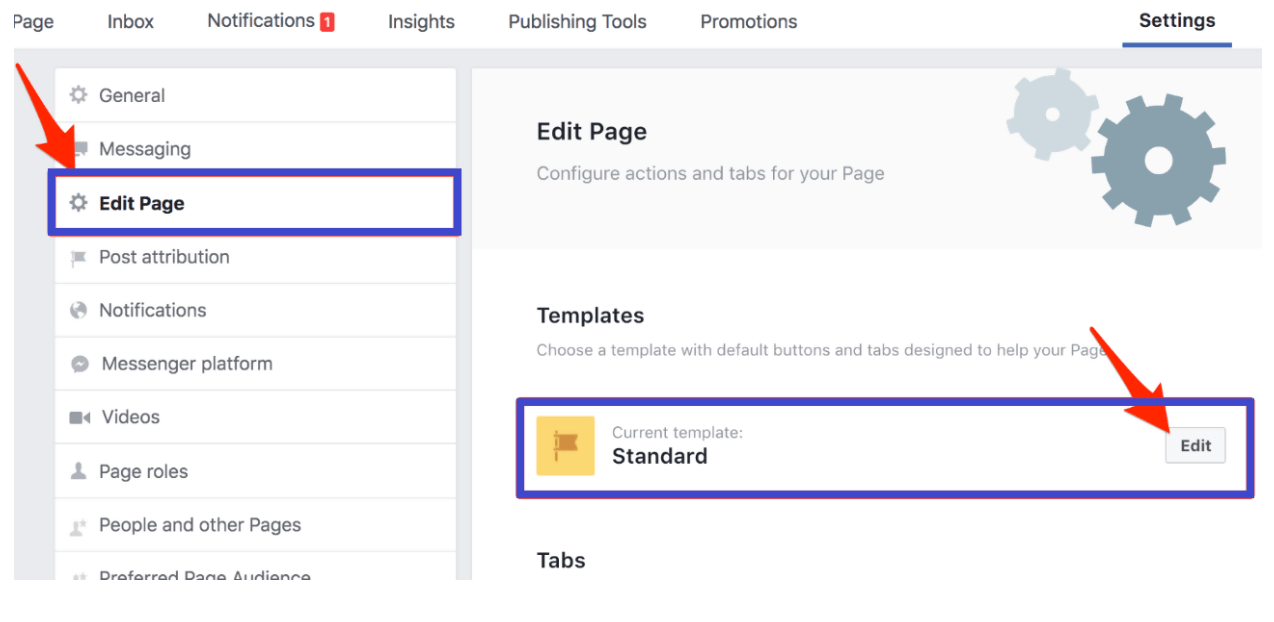
You can further click “View Details” to learn more about each page template. Remember, it’s always best to pick the Business template unless you have specific reasons to choose one of the others.
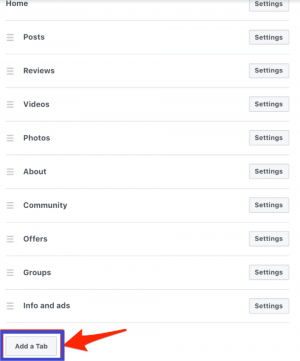
Step 9: Add and/or Rearrange Your Tabs
You can change your tabs’ order or add new ones as per your needs. These tabs appear underneath your profile image in the left sidebar.
Step 10: Create a Username for Your Business Page
Choose a unique username for your page by heading over to Page >> About >> Create Page @username. Whatever name you choose, keep it simple and easy to remember.

Also, while you’re at it, input your business information in the About section. This will help users find your business page, and provide more context when new followers are eager to learn about your brand.
Step 11: Add Your Story
This is displayed prominently on your page in the right-hand sidebar. Head over to About >> Tell people about your business to edit your story. Facebook lets you add three elements:
- Header image
- Title
- Body Text
Once you’ve created your Story, click “Save” and publish it whenever you’re ready.
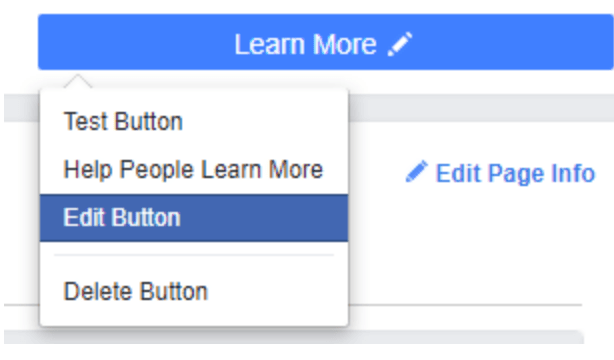
Step 12: Add a CTA Button
The Call-to-Action (CTA) button of your page can capture prospects and leads. Many templates will show the “Send Message” or “Learn More” button to start. You can change this by clicking the pencil icon and select “Edit button” that appears on the drop-down menu.
Facebook offers different CTAs to choose from:
- Make a booking with you
- Contact you
- Learn more about your brand or business
- Shop with you or make a donation
- Download your app or play your game
Choose “Shop with you or make a donation” if you’re an eCommerce business. Once you’ve picked your CTA button, hit “Next.” Now, you can use it to link to your site or send customers to the Shop section of your Business page.
Step 13: Create Your First Post and Pin It
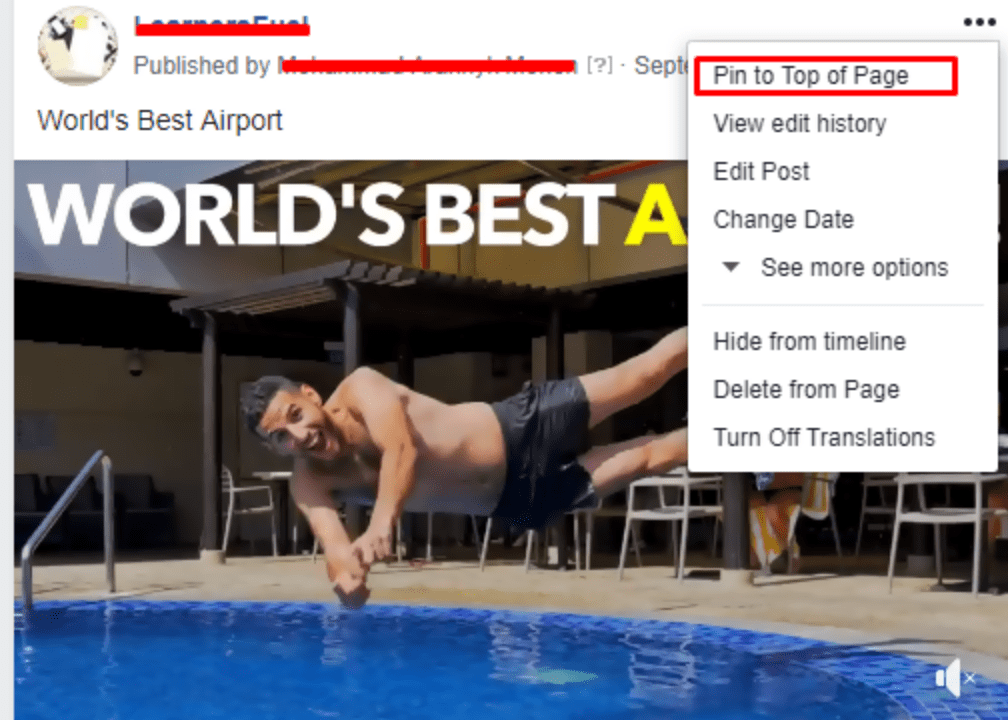
Facebook lets you pin one post to the top of your business page so that it’s the first post a user sees whenever they visit your page.
Facebook gives you a bunch of options. See the screenshot below!
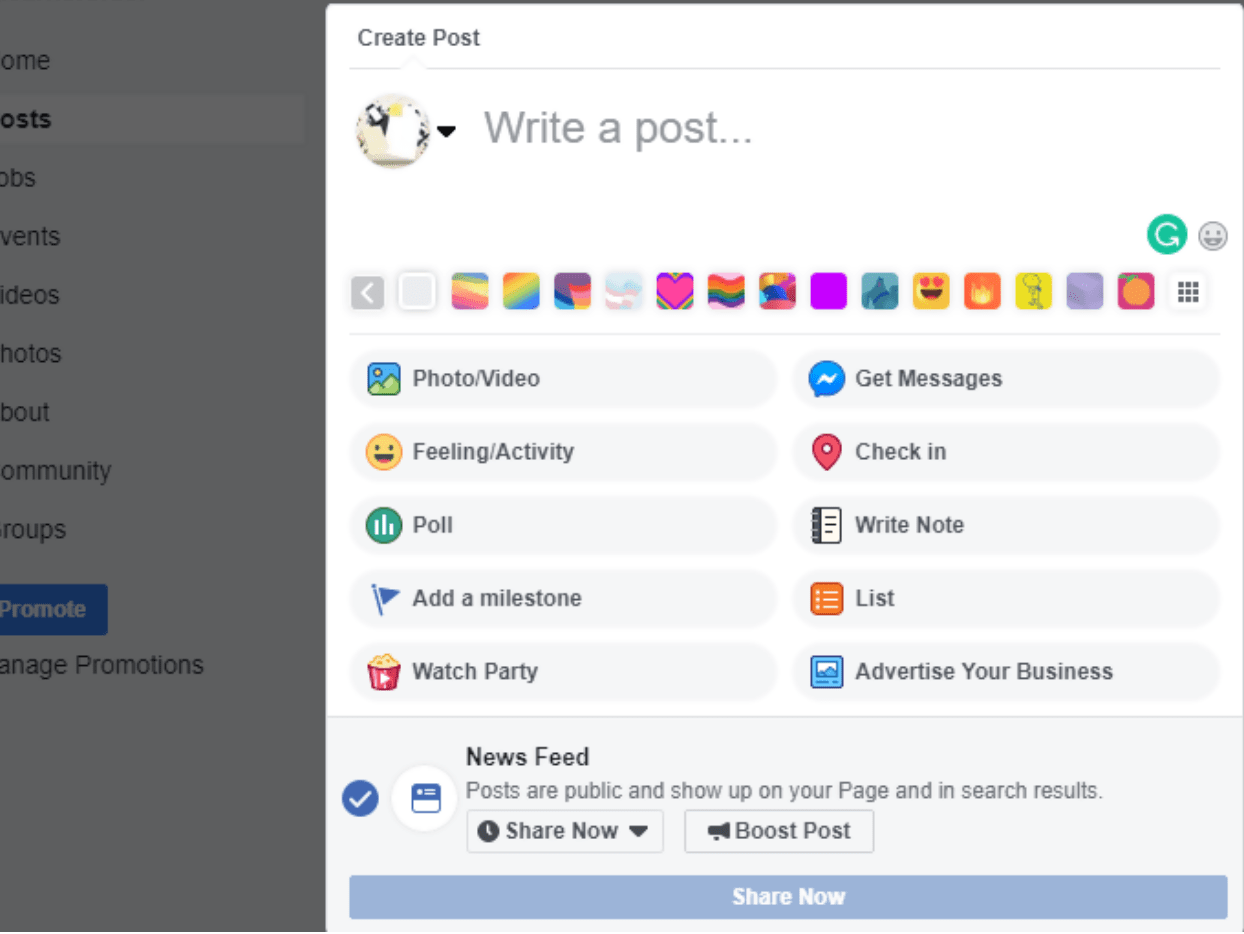
You can use this opportunity to promote your key value proposition or current offer. Once you’ve created your first post, click the three dots indicating the drop-down menu. Now, hit the “Pin top of page” option.
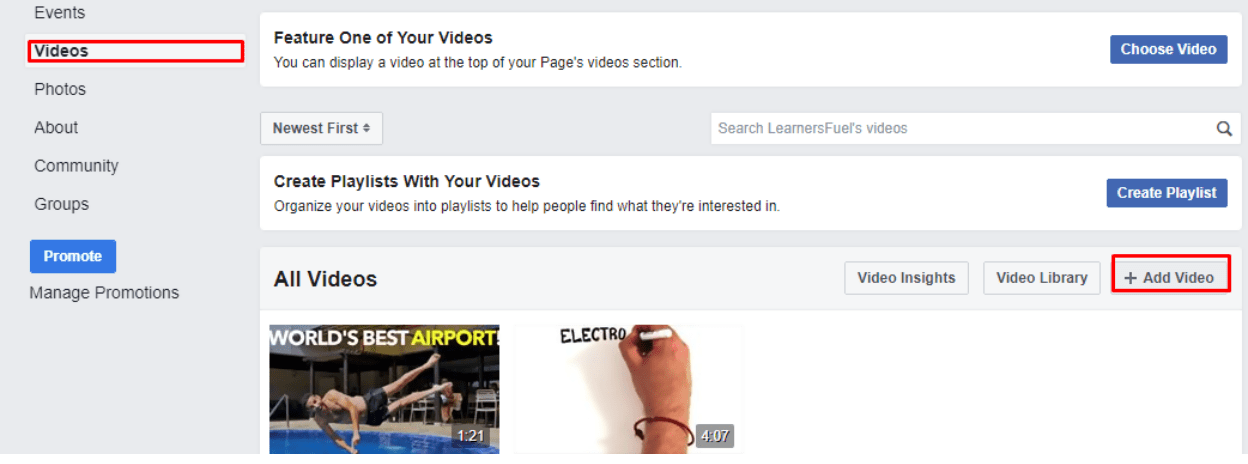
Step 14: Add Photos and Videos
Before you start promoting your page, it’s best to post some content for viewers to see. To add photos, click “Photos” and select the “Create Album” option.
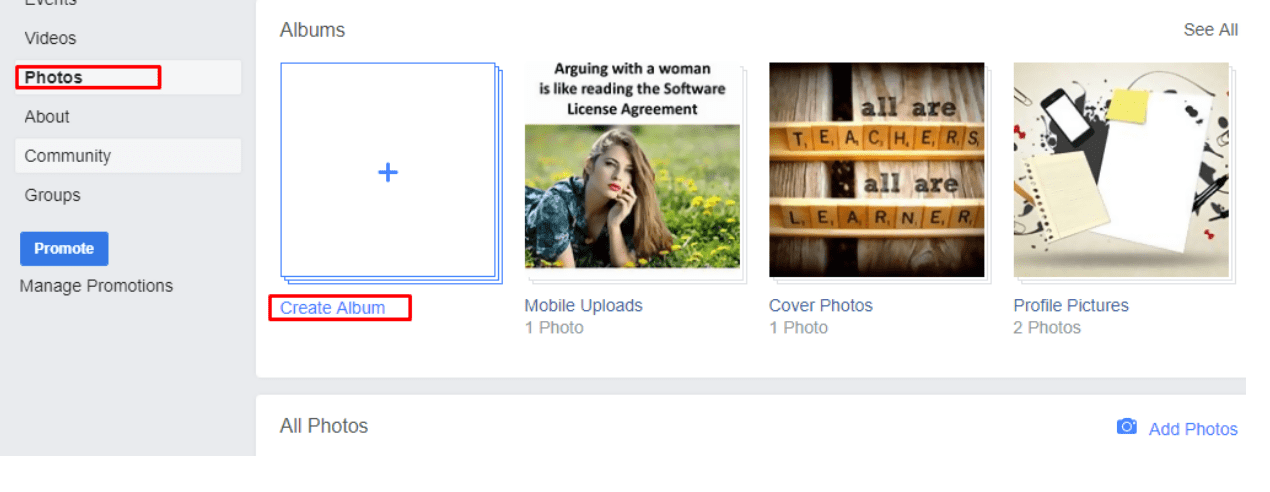
For videos, click the “Videos” tab and select the “Add Video” option.
Step 15: Review Your Facebook Page as a Visitor
So, you’ve successfully set up your Facebook Business Page. However, before sharing your page with others, it’s better to check how it will appear to visitors. Luckily, Facebook doesn’t require you to log out to view your page as a visitor.
Click the three dots indicating your drop-down menu and click “View as Page Visitor.”
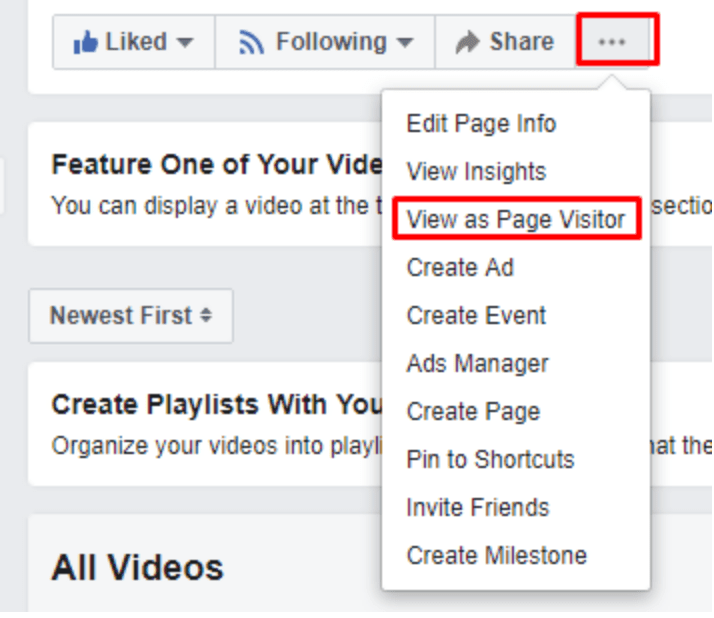
Now, you’ll see how your page appears to a new visitor. To switch back to normal mode, click “Switch back to your view” from the top of the page. You should do this often to ensure both you and your followers are happy with the way your page appears.
Step 16: Invite Users to Promote Your page
Finally, to get your business page off to a good start, consider inviting some friends to Like your page by using the “Invite Friends” tool, located in your right-hand sidebar.

This will open up a new window where you’ll see all your friends. You can write down a custom message or simply leave it as it is, then invite everyone to like your page.

Wrapping Up
So, that was pretty easy, right?
If you made it this far, we’re hopeful that you’ve already learned how to set up and optimize a Facebook Business Page in less than an hour.
Facebook is by far the largest social media network in the world. So, if you wish to expand your business online, consider creating a Facebook Business Page today.
Author Bio
Gary Peterson is working at NCSM. He was born and raised in New York. Gary is a professional writer who specializes in SEO, social problems, email marketing, and healthcare. He likes traveling and taking gorgeous photos of nature. Rock music is something that inspires him. Feel free to connect with him on Twitter.
304 Comments
Nice Post. Well sincerely I liked studying your article. The knowledge offered by you is very helpful. I am looking forward to your next post. Have an awesome day!
Very good quality articles from the content to the images, I appreciate it and will definitely share it with my friends, continue to produce more good articles like that, thank you and respect you very much.
I don’t think the title of your article matches the content lol. Just kidding, mainly because I had some doubts after reading the article. https://accounts.binance.com/vi/register?ref=V2H9AFPY
638547 745702Excellent read, I just passed this onto a friend who was doing some research on that. And he really bought me lunch since I identified it for him smile So let me rephrase that: Thank you for lunch! 674791
Thanks for sharing. I read many of your blog posts, cool, your blog is very good. https://www.binance.com/sk/register?ref=OMM3XK51
Mani rahnama is a canadian cheater! ShipShop is a marketplace, which is located in Armenia. The purpose of platform is to promote sellers activities and get chance buyers to simplify shopping …
whoah this weblog is magnificent i like reading your articles.
Keep up the great work! You realize, lots of persons are looking around for
this info, you can help them greatly.
My developer is trying to persuade me to move to .net from PHP.
I have always disliked the idea because of the expenses.
But he’s tryiong none the less. I’ve been using Movable-type on numerous
websites for about a year and am nervous about
switching to another platform. I have heard excellent things about blogengine.net.
Is there a way I can transfer all my wordpress posts into it?
Any help would be really appreciated!
Great site. Lots of useful info here. I?m sending it to several friends ans also sharing in delicious. And of course, thanks for your sweat!
Valuable information. Lucky me I found your site by accident, and I am shocked why this accident did not happened earlier! I bookmarked it.
It is really a nice and useful piece of info. I am glad that you shared this helpful information with us. Please keep us up to date like this. Thanks for sharing.
Based on my observation, after a the foreclosure home is marketed at an auction, it is common to the borrower to still have some sort ofthat remaining unpaid debt on the personal loan. There are many lenders who try and have all costs and liens paid by the following buyer. Having said that, depending on specified programs, legislation, and state regulations there may be a number of loans which are not easily solved through the switch of financial loans. Therefore, the responsibility still rests on the lender that has obtained his or her property foreclosed on. Thank you for sharing your opinions on this blog site.
What i do not realize is actually how you’re not really much more well-liked than you might be now. You’re very intelligent. You realize therefore significantly relating to this subject, made me personally consider it from numerous varied angles. Its like women and men aren’t fascinated unless it?s one thing to do with Lady gaga! Your own stuffs outstanding. Always maintain it up!
Sutter Health
I have realized that over the course of building a relationship with real estate owners, you’ll be able to come to understand that, in most real estate contract, a commission rate is paid. All things considered, FSBO sellers don’t “save” the commission. Rather, they struggle to win the commission through doing a good agent’s occupation. In completing this task, they expend their money plus time to execute, as best they can, the assignments of an broker. Those jobs include displaying the home by means of marketing, offering the home to all buyers, constructing a sense of buyer emergency in order to make prompt an offer, organizing home inspections, dealing with qualification checks with the loan provider, supervising repairs, and facilitating the closing.
What?s Taking place i am new to this, I stumbled upon this I have found It absolutely helpful and it has aided me out loads. I’m hoping to contribute & help different customers like its helped me. Good job.
Excellent read, I just passed this onto a colleague who was doing some research on that. And he actually bought me lunch as I found it for him smile Therefore let me rephrase that: Thank you for lunch!
Someone essentially lend a hand to make severely articles I would state. That is the first time I frequented your web page and so far? I amazed with the research you made to make this actual submit extraordinary. Great activity!
I’m not that much of a internet reader to be honest but your blogs really nice, keep it up! I’ll go ahead and bookmark your website to come back in the future. All the best
I was suggested this blog by my cousin. I am now not certain whether or not this submit is written by way of him as nobody else recognise such particular approximately my trouble. You are incredible! Thanks!
This article is absolutely incredible! The author has done a fantastic job of conveying the information in an captivating and educational manner. I can’t thank him enough for sharing such priceless insights that have definitely enriched my awareness in this topic. Kudos to her for producing such a gem!
124456 185365I conceive this internet website has got some really exceptional info for every person : D. 7962
naturally like your web-site but you need to check the spelling on several of your posts. Several of them are rife with spelling problems and I find it very bothersome to tell the truth nevertheless I will surely come back again.
Your house is valueble for me. Thanks!?
I am not sure where you are getting your information, but great topic. I needs to spend some time learning much more or understanding more. Thanks for wonderful information I was looking for this info for my mission.
I’d personally also like to state that most people that find themselves with out health insurance usually are students, self-employed and those that are out of work. More than half in the uninsured are under the age of Thirty five. They do not really feel they are wanting health insurance as they are young along with healthy. Their income is generally spent on housing, food, and also entertainment. Some people that do represent the working class either full or as a hobby are not made available insurance by their work so they get along without due to rising valuation on health insurance in the us. Thanks for the thoughts you write about through this blog.
This article is a refreshing change! The author’s distinctive perspective and insightful analysis have made this a truly captivating read. I’m grateful for the effort she has put into creating such an enlightening and provocative piece. Thank you, author, for offering your expertise and igniting meaningful discussions through your brilliant writing!
I’ve learned several important things through your post. I’d also like to state that there might be situation where you will make application for a loan and don’t need a co-signer such as a Government Student Aid Loan. When you are getting financing through a regular finance company then you need to be prepared to have a co-signer ready to help you. The lenders can base their own decision using a few issues but the most important will be your credit history. There are some creditors that will furthermore look at your work history and decide based on that but in most cases it will depend on your score.
I am not positive where you are getting your info, but good topic. I must spend some time finding out much more or working out more. Thank you for magnificent information I used to be looking for this information for my mission.
I do believe all the concepts you have offered to your post. They are really convincing and will definitely work. Still, the posts are too brief for novices. Could you please lengthen them a little from next time? Thank you for the post.
I have discovered some new issues from your web-site about computer systems. Another thing I’ve always presumed is that computer systems have become a product that each household must have for several reasons. They provide convenient ways to organize homes, pay bills, shop, study, focus on music and perhaps watch television shows. An innovative solution to complete all of these tasks is to use a computer. These desktops are portable ones, small, strong and portable.
I pay a quick visit each day some websites and sites
to read articles or reviews, except this blog provides feature based posts.
I think other web site proprietors should take this website as an model, very clean and magnificent user friendly style and design, let alone the content. You’re an expert in this topic!
Thank you for the auspicious writeup. It in fact was a amusement account it.
Look advanced to far added agreeable from you!
By the way, how can we communicate?
I like what you guys are up also. Such smart work and reporting! Carry on the superb works guys I have incorporated you guys to my blogroll. I think it will improve the value of my web site 🙂
The next time I learn a blog, I hope that it doesnt disappoint me as much as this one. I imply, I know it was my option to read, but I truly thought youd have something fascinating to say. All I hear is a bunch of whining about something that you might fix in case you werent too busy looking for attention.
Howdy are using WordPress for your blog platform? I’m new to the blog world but I’m trying to get started and create my own. Do you require any html coding expertise to make your own blog? Any help would be really appreciated!
I have realized that in digital camera models, unique devices help to {focus|concentrate|maintain focus|target|a**** automatically. The particular sensors connected with some video cameras change in in the area of contrast, while others work with a beam associated with infra-red (IR) light, specifically in low light. Higher standards cameras often use a blend of both systems and probably have Face Priority AF where the dslr camera can ‘See’ a face and concentrate only on that. Thank you for sharing your opinions on this website.
hey there and thank you for your information ? I?ve definitely picked up anything new from right here. I did however expertise some technical issues using this site, since I experienced to reload the web site many times previous to I could get it to load correctly. I had been wondering if your web hosting is OK? Not that I’m complaining, but sluggish loading instances times will sometimes affect your placement in google and can damage your high-quality score if ads and marketing with Adwords. Anyway I?m adding this RSS to my e-mail and could look out for much more of your respective interesting content. Make sure you update this again very soon..
There are some interesting closing dates on this article however I don?t know if I see all of them center to heart. There’s some validity however I’ll take hold opinion until I look into it further. Good article , thanks and we would like extra! Added to FeedBurner as properly
What?s Going down i’m new to this, I stumbled upon this I’ve discovered It absolutely useful and it has helped me out loads. I’m hoping to contribute & aid other users like its helped me. Great job.
https://www.dimepoker.cl/noticias/mundo/luca-pagano-el-rey-de-europa
It?s actually a great and useful piece of information. I?m happy that you just shared this useful info with us. Please stay us informed like this. Thank you for sharing.
Hello, i believe that i noticed you visited my web site so i got here to ?return the desire?.I’m attempting to find issues to enhance my site!I guess its ok to use a few of your concepts!!
Thanks for giving your ideas in this article. The other issue is that any time a problem arises with a laptop or computer motherboard, people today should not take the risk associated with repairing this themselves for if it is not done right it can lead to permanent damage to the full laptop. It is usually safe just to approach a dealer of that laptop for that repair of its motherboard. They will have technicians who may have an skills in dealing with mobile computer motherboard problems and can have the right prognosis and conduct repairs.
142448 144375I got what you mean ,bookmarked , extremely good internet internet site . 863013
http://www.factorytapestry.com is a Trusted Online Wall Hanging Tapestry Store. We are selling online art and decor since 2008, our digital business journey started in Australia. We sell 100 made-to-order quality printed soft fabric tapestry which are just too perfect for decor and gifting. We offer Up-to 50 OFF Storewide Sale across all the Wall Hanging Tapestries. We provide Fast Shipping USA, CAN, UK, EUR, AUS, NZ, ASIA and Worldwide Delivery across 100+ countries.
Thanks for the guidelines you have contributed here. Something important I would like to say is that computer memory demands generally go up along with other developments in the technology. For instance, whenever new generations of processor chips are brought to the market, there is usually a corresponding increase in the scale preferences of all laptop or computer memory along with hard drive space. This is because the software operated by way of these processor chips will inevitably surge in power to benefit from the new know-how.
I?d should test with you here. Which is not something I normally do! I get pleasure from studying a publish that will make folks think. Additionally, thanks for permitting me to comment!
Today, while I was at work, my sister stole my iPad and tested to see if it can survive a twenty five foot drop, just so she can be a youtube sensation. My apple ipad is now broken and she has 83 views. I know this is totally off topic but I had to share it with someone!
fantastic issues altogether, you just won a new reader. What would you suggest in regards to your publish that you just made a few days in the past? Any certain?
Wish to see much more like this. Thanks for sharing your information
Definitely imagine that that you said. Your favourite reason appeared to be on the internet the easiest thing to bear in mind of. I say to you, I certainly get irked even as other folks consider worries that they plainly don’t recognise about. You controlled to hit the nail upon the top and outlined out the entire thing without having side-effects , folks can take a signal. Will likely be again to get more. Thank you
I appreciate, cause I found just what I was looking for. You’ve ended my four day long hunt! God Bless you man. Have a nice day. Bye
When I initially commented I clicked the -Notify me when new feedback are added- checkbox and now each time a remark is added I get four emails with the same comment. Is there any approach you’ll be able to remove me from that service? Thanks!
Almanya’nın en iyi medyumu haluk hoca sayesinde sizlerde güven içerisinde çalışmalar yaptırabilirsiniz, 40 yıllık uzmanlık ve tecrübesi ile sizlere en iyi medyumluk hizmeti sunuyoruz.
Almanya’nın en iyi medyumu haluk hoca sayesinde sizlerde güven içerisinde çalışmalar yaptırabilirsiniz, 40 yıllık uzmanlık ve tecrübesi ile sizlere en iyi medyumluk hizmeti sunuyoruz.
http://www.thebudgetart.com is trusted worldwide canvas wall art prints & handmade canvas paintings online store. Thebudgetart.com offers budget price & high quality artwork, up-to 50 OFF, FREE Shipping USA, AUS, NZ & Worldwide Delivery.
you have got an important blog here! would you prefer to make some invite posts on my blog?
I can’t believe how amazing this article is! The author has done a fantastic job of conveying the information in an engaging and enlightening manner. I can’t thank her enough for offering such precious insights that have undoubtedly enriched my understanding in this topic. Kudos to her for crafting such a gem!
I have been exploring for a little bit for any high quality articles or blog posts on this sort of area . Exploring in Yahoo I at last stumbled upon this site. Reading this information So i am happy to convey that I have an incredibly good uncanny feeling I discovered just what I needed. I most certainly will make certain to do not forget this website and give it a look on a constant basis.
Currently it appears like Movable Type is the preferred blogging platform available right now. (from what I’ve read) Is that what you’re using on your blog?
Hey there I am so glad I found your blog, I really found you by accident, while I was browsing on Aol for something else, Anyhow I am here now and would just like to say kudos for a tremendous post and a all round exciting blog (I also love the theme/design), I don’t have time to read through it all at the minute but I have book-marked it and also included your RSS feeds, so when I have time I will be back to read much more, Please do keep up the great job.
It?s actually a nice and useful piece of information. I am glad that you shared this helpful information with us. Please keep us informed like this. Thanks for sharing.
Thanks for your helpful article. Other thing is that mesothelioma is generally the result of the inhalation of materials from mesothelioma, which is a extremely dangerous material. It can be commonly viewed among individuals in the engineering industry who’ve long exposure to asbestos. It is also caused by living in asbestos insulated buildings for an extended time of time, Genetic makeup plays a huge role, and some folks are more vulnerable on the risk as compared to others.
This really answered my problem, thanks!
Excellent beat ! I wish to apprentice while you amend your site, how could i subscribe for a blog website? The account aided me a acceptable deal. I had been tiny bit acquainted of this your broadcast offered bright clear concept
[email protected]
Excellent items from you, man. I have consider your stuff prior
to and you are simply too wonderful. I actually
like what you’ve received right here, certainly
like what you are stating and the way in which in which
you say it. You’re making it entertaining and you still care
for to stay it wise. I cant wait to read much more from you.
This is actually a great web site.
Thank you for another excellent article. The place else may anyone get that
kind of info in such an ideal manner of writing? I have a presentation next week, and I’m on the look
for such information.
Hello there! This is my 1st comment here so I just wanted to give a quick shout out and say I really
enjoy reading your articles. Can you suggest any other blogs/websites/forums that go over the same subjects?
Thanks for your time!
Hi there, I found your website by way of Google whilst looking for
a related topic, your website got here up, it seems to
be great. I’ve bookmarked it in my google bookmarks.
Hi there, simply was aware of your weblog thru Google, and
found that it’s truly informative. I’m going to be careful for brussels.
I will be grateful if you happen to continue this in future.
Lots of other folks can be benefited from your writing. Cheers!
That is really interesting, You are a very professional blogger.
I have joined your feed and look ahead to in search of extra of your excellent
post. Also, I’ve shared your web site in my social networks
It’s difficult to find well-informed people on this subject, however, you seem like
you know what you’re talking about! Thanks
each time i used to read smaller content which also clear their
motive, and that is also happening with this paragraph which I
am reading at this time.
I’m not that much of a internet reader to be honest but your
blogs really nice, keep it up! I’ll go ahead and bookmark your website to come back down the road.
All the best
[email protected]
It’s a shame you don’t have a donate button! I’d definitely donate to this brilliant blog! I guess for now i’ll settle for bookmarking and adding your RSS feed to my Google account. I look forward to brand new updates and will share this blog with my Facebook group. Chat soon!
https://cruzdu8iw.blogcudinti.com/22904444/5-essential-elements-for-chinese-medicine-for-inflammation https://miloxhkn801235.newsbloger.com/23026751/the-fact-about-korean-massage-spa-that-no-one-is-suggesting https://thomaso023iih5.snack-blog.com/profile https://socialtechnet.com/story1160712/how-much-you-need-to-expect-you-ll-pay-for-a-good-korean-massage-beds-ceragem https://deana9fl1.wizzardsblog.com/22997694/little-known-facts-about-korean-massage-las-vegas https://yesbookmarks.com/story15913277/the-basic-principles-of-korean-massage-cupping
https://margaretm766dti2.hazeronwiki.com/user https://jaidenq0a23.spintheblog.com/23049569/massage-chinese-garden-an-overview https://mohamedr369chk8.blogunteer.com/profile https://kemalk788soh3.activosblog.com/profile https://beau849g9.shotblogs.com/the-basic-principles-of-korean-massage-clark-36556831 https://lorenzo962mp.idblogz.com/23121845/not-known-facts-about-korean-bubble-massage
https://bookmarkquotes.com/story15877165/5-tips-about-thailand-massage-you-can-use-today https://dantew3g4j.blogoscience.com/28456261/how-much-you-need-to-expect-you-ll-pay-for-a-good-massage-korean-spas https://marcoe6789.jaiblogs.com/49136747/a-secret-weapon-for-massage-korean-spas https://chapline162asf6.blogoscience.com/profile https://juvenalc837qni8.wikigiogio.com/user
https://zane89b2a.activoblog.com/22987918/the-basic-principles-of-chinese-medicine-bloating https://bookmark-master.com/story15872236/5-simple-statements-about-korean-massage-beds-ceragem-explained https://travis0hj06.thekatyblog.com/22810257/top-guidelines-of-chinese-medicine-cooker https://mylesn2570.blogdigy.com/5-essential-elements-for-chinese-medicine-bloating-36554588 https://williamp246nnk6.azuria-wiki.com/user https://tyson80987.life3dblog.com/22857471/5-simple-techniques-for-chinese-medicine-body-map https://getsocialpr.com/story16174965/what-does-chinese-medicine-cupping-mean https://andy4ol56.dbblog.net/54494652/chinese-medicine-journal-for-dummies https://tysond08af.dgbloggers.com/23037911/the-smart-trick-of-massage-chinese-translation-that-no-one-is-discussing
https://garrett65p6p.activoblog.com/22991390/5-easy-facts-about-chinese-medicine-blood-deficiency-described https://edwin5rnhz.blogocial.com/not-known-facts-about-korean-massage-near-19002-58521291 https://henryd479yeh6.life3dblog.com/22827566/the-smart-trick-of-chinese-medicine-journal-that-no-one-is-discussing https://tysone1963.fireblogz.com/53752526/5-essential-elements-for-chinese-medicine-bloating https://meshbookmarks.com/story15846918/how-much-you-need-to-expect-you-ll-pay-for-a-good-thailand-massage-bangkok https://devin41740.blogoscience.com/28505214/chinese-medicine-clinic-an-overview https://bookmarkize.com/story15865620/city-massage-secrets https://tonya680zyx1.laowaiblog.com/profile https://finnn05if.blogzet.com/about-chinese-massage-perkins-37274636
https://andresj8630.anchor-blog.com/3243165/what-does-chinese-medicine-cupping-mean https://jasper8hige.mybloglicious.com/43954279/the-5-second-trick-for-massage-koreatown-los-angeles https://mysocialguides.com/story1180137/examine-this-report-on-chinese-medicine-breakfast https://andres3s5rw.alltdesign.com/everything-about-massage-chinese-foot-42785346 https://hector57s8o.bloggip.com/22853391/not-known-details-about-massage-business-plan-example-pdf https://tyson29405.buyoutblog.com/22989851/the-5-second-trick-for-chinese-medicine-cooling-foods https://tysonr1234.blog-gold.com/28634490/chinese-medicine-basics-options https://chanceelml78901.luwebs.com/22902607/us-massage-service-no-further-a-mystery https://elenai801dca2.westexwiki.com/user
https://manuel92j5m.ageeksblog.com/22806335/not-known-details-about-chinese-medicine-brain-fog https://chances1223.suomiblog.com/rumored-buzz-on-massage-korean-spas-38143124 https://claytonf6778.ambien-blog.com/28602648/little-known-facts-about-chinese-medicine-acupuncture-points https://jaredi93c5.blogchaat.com/22920765/not-known-factual-statements-about-chinese-medicine-basics https://clayton14l6l.ssnblog.com/22808727/business-trip-management-system-for-dummies https://spencer70001.techionblog.com/23004991/a-simple-key-for-chinese-medicine-basics-unveiled https://alexist6295.theideasblog.com/23145966/not-known-details-about-chinese-medicine-brain-fog https://riverikgc33333.eedblog.com/22811036/the-definitive-guide-to-chinese-medical-massage https://peterl677nha1.muzwiki.com/user
https://mariellaq123gdc2.wikibestproducts.com/user https://jaidenc4567.blogzet.com/about-chinese-medicine-books-37272127 https://clarencea836yis2.pennywiki.com/user https://thegreatbookmark.com/story15874452/examine-this-report-on-massage-koreanisch https://messiah13186.blogzet.com/healthy-massage-bangkok-can-be-fun-for-anyone-37236096 https://dallasp0588.look4blog.com/61914656/not-known-factual-statements-about-chinese-medicine-basics https://charlie5vwa2.blogs100.com/23097580/considerations-to-know-about-massage-healthy-spa https://caiden2q891.blogdun.com/23097784/the-basic-principles-of-chinese-medicine-classes
https://henrym530lvd9.mysticwiki.com/user
The heart of your writing whilst appearing reasonable at first, did not really work properly with me personally after some time. Someplace throughout the sentences you were able to make me a believer but just for a while. I still have got a problem with your jumps in assumptions and one might do well to fill in those breaks. If you can accomplish that, I will definitely be amazed.
https://mylesi7q88.sharebyblog.com/22849992/healthy-massage-atascocita-an-overview
https://marco0ec61.canariblogs.com/5-easy-facts-about-chinese-medicine-for-inflammation-described-38125988
At this time it seems like Drupal is the top blogging platform out there right now. (from what I’ve read) Is that what you are using on your blog?
http://www.mybudgetart.com.au is Australia’s Trusted Online Wall Art Canvas Prints Store. We are selling art online since 2008. We offer 2000+ artwork designs, up-to 50 OFF store-wide, FREE Delivery Australia & New Zealand, and World-wide shipping to 50 plus countries.
Hurrah, that’s what I was seeking for, what a information! present here at this web site,
thanks admin of this web page.
Hi there! Do you know if they make any plugins to assist with SEO?
I’m trying to get my blog to rank for some targeted keywords but I’m
not seeing very good results. If you know of any
please share. Thank you!
Hey! This is kind of off topic but I need some guidance
from an established blog. Is it tough to set up your own blog?
I’m not very techincal but I can figure things out pretty quick.
I’m thinking about setting up my own but I’m not sure
where to begin. Do you have any ideas or suggestions? Thank you
Good web site you have here.. It’s hard to find quality writing like yours nowadays.
I seriously appreciate individuals like you! Take care!!
I don’t even know the way I ended up right here, however I assumed this submit was once good.
I do not know who you’re but definitely you’re going to a famous blogger when you are
not already. Cheers!
Unquestionably believe that which you stated.
Your favorite reason seemed to be on the net the easiest thing to be aware
of. I say to you, I definitely get annoyed while people think about worries that they plainly do not know about.
You managed to hit the nail upon the top and defined out the
whole thing without having side effect , people can take a signal.
Will likely be back to get more. Thanks
What’s Taking place i am new to this, I stumbled upon this I have discovered It absolutely useful and it has helped me out loads.
I hope to give a contribution & help other customers like its aided me.
Great job.
I pay a visit daily a few websites and sites to read articles or reviews, except this web site provides feature based articles.
When some one searches for his necessary thing, therefore he/she desires to be available that in detail, so that thing is maintained over here.
I truly love your site.. Great colors & theme.
Did you make this amazing site yourself? Please reply
back as I’m looking to create my own blog and would like to know where you got this from or just what the
theme is called. Thanks!
Spot on with this write-up, I actually feel this amazing site
needs much more attention. I’ll probably be returning to read through more, thanks for the advice!
Hey there, I think your blog might be having browser compatibility issues.
When I look at your blog in Safari, it looks fine but when opening in Internet Explorer, it has some overlapping.
I just wanted to give you a quick heads up! Other then that, fantastic
blog!
hi!,I like your writing so much! share we communicate more about your article on AOL? I require a specialist on this area to solve my problem. Maybe that’s you! Looking forward to see you.
https://walterj677iar7.blogrenanda.com/profile
https://judahb35if.thezenweb.com/korean-massage-spa-san-diego-no-further-a-mystery-59964325
https://ricardo36s8u.onzeblog.com/22884373/getting-my-massage-business-plan-example-to-work
https://trevorokhc22222.goabroadblog.com/22700713/not-known-facts-about-us-massage-service
https://deanr12e3.amoblog.com/indicators-on-chinese-medical-massage-you-should-know-44180354
https://trevoro2840.worldblogged.com/28331992/top-latest-five-chinese-medicine-body-map-urban-news
https://benitoc689wus9.bloggadores.com/profile
https://caidenjppp89022.blogdal.com/22887236/indicators-on-chinese-medical-massage-you-should-know
https://dalton57777.madmouseblog.com/3412867/examine-this-report-on-chinese-medicine-blood-pressure
https://emilio69bz1.bcbloggers.com/22836714/the-basic-principles-of-korean-massage-cupping
https://archert6048.get-blogging.com/23061830/how-chinese-medicine-breakfast-can-save-you-time-stress-and-money
https://bookmarklinkz.com/story15864287/everything-about-chinese-medicine-cupping
https://manuel23j5j.tokka-blog.com/23084493/the-2-minute-rule-for-chinese-medicine-breakfast
https://damien36s9t.alltdesign.com/indicators-on-chinese-medicine-books-you-should-know-42784449
https://landen91f3g.blogs100.com/23024610/5-tips-about-massage-therapy-business-plan-example-you-can-use-today
Howdy, i read your blog from time to time and i own a similar one and i was just curious if you get a lot of spam feedback? If so how do you prevent it, any plugin or anything you can recommend? I get so much lately it’s driving me insane so any help is very much appreciated.
Hello! I just wanted to ask if you ever have any problems with hackers? My last blog (wordpress) was hacked and I ended up losing several weeks of hard work due to no backup. Do you have any methods to protect against hackers?
https://wilhelmb567okg3.like-blogs.com/profile
https://felix1h0dg.educationalimpactblog.com/44895409/massage-chinese-translation-options
https://andresh67qn.theisblog.com/23052607/korean-massage-spa-nyc-no-further-a-mystery
https://bookmark-vip.com/story15856467/the-best-side-of-city-massage-columbus-ga
https://siambookmark.com/story15888329/considerations-to-know-about-massage-therapy-business-plan-example
https://seth59125.azzablog.com/23043160/chinese-medicine-clinic-an-overview
Howdy! Someone in my Myspace group shared this site with us so I came to give it a look. I’m definitely enjoying the information. I’m book-marking and will be tweeting this to my followers! Great blog and superb style and design.
whoah this blog is great i love reading your posts. Keep up the good work! You know, lots of people are hunting around for this info, you can aid them greatly.
https://griffingjgbw.blogzet.com/the-fact-about-thailand-massage-school-that-no-one-is-suggesting-37241297
https://stephenz8417.dm-blog.com/22973969/5-easy-facts-about-chinese-medicine-basics-described
https://israel0k678.creacionblog.com/22894481/the-basic-principles-of-chinese-medicine-for-inflammation
Do you have a spam issue on this website; I also am a blogger, and I was curious about your situation; we have created some nice procedures and we are looking to trade methods with other folks, be sure to shoot me an email if interested.
It’s going to be end of mine day, but before ending I am reading this great
post to improve my knowledge.
Heya are using WordPress for your site platform? I’m new to the blog world but I’m trying to get started and create my own. Do you need any html coding knowledge to make your own blog? Any help would be greatly appreciated!
https://tyson92222.livebloggs.com/28678209/rumored-buzz-on-chinese-medicine-body-chart
https://johnq122dbx0.blogs100.com/profile
https://dallas6qnjf.like-blogs.com/22809832/new-step-by-step-map-for-chinese-medicine-chart
Good day I am so glad I found your weblog, I really found you by error, while I
was looking on Bing for something else, Anyhow I am here now
and would just like to say cheers for a incredible post and a all round thrilling blog
(I also love the theme/design), I don’t have time to read it all at the moment but I have saved it
and also added in your RSS feeds, so when I have time I will be back
to read a lot more, Please do keep up the awesome b.
https://keegan4tu0y.jiliblog.com/80291129/5-easy-facts-about-massage-business-trip-to-korean-large-cities-described
https://spencerv34k6.canariblogs.com/5-easy-facts-about-chinese-medical-massage-described-38018095
https://thebookmarkage.com/story15806354/everything-about-thailand-massage-shops
I don?t even know the way I ended up here, but I assumed this publish used to be good. I do not understand who you’re however certainly you are going to a famous blogger in case you are not already 😉 Cheers!
Thanks for your publish. I have usually noticed that most people are wanting to lose weight simply because they wish to appear slim in addition to looking attractive. On the other hand, they do not usually realize that there are additional benefits for losing weight in addition. Doctors claim that over weight people come across a variety of illnesses that can be directly attributed to their excess weight. The good news is that people who’re overweight and suffering from several diseases can help to eliminate the severity of their particular illnesses by simply losing weight. It is possible to see a steady but noted improvement in health if even a slight amount of weight reduction is realized.
https://cates417tuv4.birderswiki.com/user
https://dean3st01.free-blogz.com/69715210/the-smart-trick-of-chinese-medicine-journal-that-no-one-is-discussing
https://nicolausp158eqb4.worldblogged.com/profile
https://titus39506.blogdomago.com/22857097/what-does-chinese-medicine-clinic-mean
https://collins5802.suomiblog.com/top-chinese-medicine-breakfast-secrets-38212006
https://river6zzu6.izrablog.com/23104889/massage-healthy-things-to-know-before-you-buy
You have noted very interesting details! ps decent web site.
I have mastered some important things through your blog post. One other subject I would like to convey is that there are plenty of games on the market designed mainly for preschool age young children. They include things like pattern acceptance, colors, dogs, and shapes. These commonly focus on familiarization rather than memorization. This will keep little ones occupied without feeling like they are studying. Thanks
https://bookmarkforest.com/story15828857/facts-about-chinese-medicine-bloating-revealed
https://dante4bm30.arwebo.com/45592290/5-tips-about-chinese-medicine-for-depression-and-anxiety-you-can-use-today
[email protected]
There is noticeably a bundle to find out about this. I assume you made certain good factors in options also.
Very nice blog post. I definitely love this site. Stick with it!
I have acquired some new points from your internet site about personal computers. Another thing I’ve always assumed is that computer systems have become a product that each residence must have for many reasons. They provide convenient ways to organize homes, pay bills, shop, study, listen to music and also watch tv programs. An innovative approach to complete all of these tasks is a notebook. These pc’s are portable ones, small, robust and transportable.
https://confuciusf677oig3.azuria-wiki.com/user
https://josuegmnn89001.blazingblog.com/22790076/about-us-massage-service
I?m not sure where you are getting your information, but good topic. I needs to spend some time learning much more or understanding more. Thanks for wonderful info I was looking for this information for my mission.
I’m very happy to read this. This is the kind of manual that needs to be given and not the accidental misinformation that’s at the other blogs. Appreciate your sharing this greatest doc.
[email protected] [email protected]
A person essentially help to make seriously posts I would state. This is the very first time I frequented your web page and thus far? I surprised with the research you made to create this particular publish amazing. Wonderful job!
Hello! Quick question that’s totally off topic. Do you know how to make your site mobile friendly? My website looks weird when viewing from my iphone 4. I’m trying to find a template or plugin that might be able to fix this issue. If you have any suggestions, please share. Thanks!
This is really interesting You re a very skilled blogger. I ve joined your feed and look forward to seeking more of your magnificent post.
Also I ve shared your site in my social networks!
https://sendgrid.com/blog/what-is-an-smtp-server/
I’m blown away by the quality of this content! The author has obviously put a tremendous amount of effort into investigating and arranging the information. It’s exciting to come across an article that not only gives valuable information but also keeps the readers hooked from start to finish. Great job to him for making such a brilliant work!
I have noticed that car insurance corporations know the cars which are at risk from accidents along with risks. They also know what type of cars are given to higher risk as well as the higher risk they’ve the higher your premium amount. Understanding the easy basics of car insurance will let you choose the right type of insurance policy that could take care of your family needs in case you become involved in any accident. Appreciate your sharing your ideas with your blog.
I appreciate, cause I found exactly what I was looking for. You’ve ended my 4 day long hunt! God Bless you man. Have a great day. Bye
[email protected]
Howdy this is somewhat of off topic but I was wanting to know if blogs use WYSIWYG editors or if you have to manually code with HTML. I’m starting a blog soon but have no coding skills so I wanted to get advice from someone with experience. Any help would be greatly appreciated!
http://www.spotnewstrend.com is a trusted latest USA News and global news provider. Spotnewstrend.com website provides latest insights to new trends and worldwide events. So keep visiting our website for USA News, World News, Financial News, Business News, Entertainment News, Celebrity News, Sport News, NBA News, NFL News, Health News, Nature News, Technology News, Travel News.
Its like you read my mind! You appear to know a lot about this, like you wrote the book in it or something. I think that you can do with a few pics to drive the message home a bit, but other than that, this is magnificent blog. An excellent read. I will definitely be back.
[email protected] [email protected] [email protected] [email protected]
Thanks for giving your ideas. I might also like to state that video games have been ever evolving. Modern tools and innovative developments have aided create reasonable and interactive games. These types of entertainment games were not that sensible when the concept was first of all being used. Just like other kinds of electronics, video games too have had to progress by many many years. This itself is testimony for the fast growth of video games.
I have been exploring for a little bit for any high quality articles or blog posts on this sort of area . Exploring in Yahoo I at last stumbled upon this site. Reading this info So i?m happy to convey that I have an incredibly good uncanny feeling I discovered exactly what I needed. I most certainly will make sure to do not forget this site and give it a look on a constant basis.
Hello there, You have done a great job. I will definitely digg it and personally suggest to my friends. I am sure they will be benefited from this website.
Hmm it looks like your site ate my first comment (it was super long) so I guess I’ll just sum it up what I had written and say, I’m thoroughly enjoying your blog. I as well am an aspiring blog writer but I’m still new to everything. Do you have any recommendations for novice blog writers? I’d definitely appreciate it.
I do agree with all of the ideas you have presented in your post. They’re really convincing and will definitely work. Still, the posts are very short for starters. Could you please extend them a bit from next time? Thanks for the post.
Do you mind if I quote a couple of your articles as long as I provide credit and sources back to your blog? My website is in the exact same niche as yours and my visitors would definitely benefit from some of the information you provide here. Please let me know if this ok with you. Thanks!
Have you ever thought about including a little bit more than just your articles? I mean, what you say is valuable and everything. Nevertheless think about if you added some great photos or video clips to give your posts more, “pop”! Your content is excellent but with pics and video clips, this website could certainly be one of the very best in its field. Amazing blog!
I wanted to take a moment to express my gratitude for the wealth of valuable information you provide in your articles. Your blog has become a go-to resource for me, and I always come away with new knowledge and fresh perspectives. I’m excited to continue learning from your future posts.
Your dedication to sharing knowledge is evident, and your writing style is captivating. Your articles are a pleasure to read, and I always come away feeling enriched. Thank you for being a reliable source of inspiration and information.
This article resonated with me on a personal level. Your ability to emotionally connect with your audience is truly commendable. Your words are not only informative but also heartwarming. Thank you for sharing your insights.
http://www.bestartdeals.com.au is Australia’s Trusted Online Canvas Prints Art Gallery. We offer 100 percent high quality budget wall art prints online since 2009. Get 30-70 percent OFF store wide sale, Prints starts $20, FREE Delivery Australia, NZ, USA. We do Worldwide Shipping across 50+ Countries.
Thank you for sharing superb informations. Your site is so cool. I am impressed by the details that you?ve on this blog. It reveals how nicely you perceive this subject. Bookmarked this web page, will come back for more articles. You, my friend, ROCK! I found simply the information I already searched everywhere and simply couldn’t come across. What an ideal site.
Your passion and dedication to your craft radiate through every article. Your positive energy is infectious, and it’s evident that you genuinely care about your readers’ experience. Your blog brightens my day!
I simply wanted to convey how much I’ve gleaned from this article. Your meticulous research and clear explanations make the information accessible to all readers. It’s abundantly clear that you’re committed to providing valuable content.
I’ve discovered a treasure trove of knowledge in your blog. Your unwavering dedication to offering trustworthy information is truly commendable. Each visit leaves me more enlightened, and I deeply appreciate your consistent reliability.
Your dedication to sharing knowledge is unmistakable, and your writing style is captivating. Your articles are a pleasure to read, and I consistently come away feeling enriched. Thank you for being a dependable source of inspiration and information.
Your positivity and enthusiasm are undeniably contagious! This article brightened my day and left me feeling inspired. Thank you for sharing your uplifting message and spreading positivity among your readers.
I have not checked in here for some time as I thought it was getting boring, but the last several posts are great quality so I guess I?ll add you back to my everyday bloglist. You deserve it my friend 🙂
Helpful info. Lucky me I discovered your web site by chance, and I’m stunned why this accident did not happened earlier! I bookmarked it.
I’m genuinely impressed by how effortlessly you distill intricate concepts into easily digestible information. Your writing style not only imparts knowledge but also engages the reader, making the learning experience both enjoyable and memorable. Your passion for sharing your expertise is unmistakable, and for that, I am deeply appreciative.
Your storytelling prowess is nothing short of extraordinary. Reading this article felt like embarking on an adventure of its own. The vivid descriptions and engaging narrative transported me, and I eagerly await to see where your next story takes us. Thank you for sharing your experiences in such a captivating manner.
Your passion and dedication to your craft radiate through every article. Your positive energy is infectious, and it’s evident that you genuinely care about your readers’ experience. Your blog brightens my day!
You could definitely see your enthusiasm in the work you write. The world hopes for even more passionate writers like you who are not afraid to say how they believe. Always go after your heart.
Oh my goodness! an amazing article dude. Thank you Nonetheless I am experiencing situation with ur rss . Don?t know why Unable to subscribe to it. Is there anyone getting similar rss problem? Anybody who is aware of kindly respond. Thnkx
I must applaud your talent for simplifying complex topics. Your ability to convey intricate ideas in such a relatable manner is admirable. You’ve made learning enjoyable and accessible for many, and I deeply appreciate that.
Your blog has rapidly become my trusted source of inspiration and knowledge. I genuinely appreciate the effort you invest in crafting each article. Your dedication to delivering high-quality content is apparent, and I eagerly await every new post.
Hiya very cool web site!! Man .. Beautiful .. Superb .. I will bookmark your blog and take the feeds additionally?I am glad to seek out so many useful info right here within the publish, we want develop extra techniques in this regard, thank you for sharing. . . . . .
I am usually to blogging and i actually respect your content. The article has actually peaks my interest. I am going to bookmark your website and preserve checking for brand new information.
I am continually impressed by your ability to delve into subjects with grace and clarity. Your articles are both informative and enjoyable to read, a rare combination. Your blog is a valuable resource, and I am sincerely grateful for it.
I wanted to take a moment to express my gratitude for the wealth of invaluable information you consistently provide in your articles. Your blog has become my go-to resource, and I consistently emerge with new knowledge and fresh perspectives. I’m eagerly looking forward to continuing my learning journey through your future posts.
In a world where trustworthy information is more crucial than ever, your dedication to research and the provision of reliable content is truly commendable. Your commitment to accuracy and transparency shines through in every post. Thank you for being a beacon of reliability in the online realm.
Your storytelling prowess is nothing short of extraordinary. Reading this article felt like embarking on an adventure of its own. The vivid descriptions and engaging narrative transported me, and I eagerly await to see where your next story takes us. Thank you for sharing your experiences in such a captivating manner.
This article resonated with me on a personal level. Your ability to emotionally connect with your audience is truly commendable. Your words are not only informative but also heartwarming. Thank you for sharing your insights.
Your passion and dedication to your craft radiate through every article. Your positive energy is infectious, and it’s evident that you genuinely care about your readers’ experience. Your blog brightens my day!
Thanks for making me to attain new ideas about pc’s. I also hold the belief that certain of the best ways to maintain your notebook in primary condition is with a hard plastic material case, as well as shell, that fits over the top of your computer. Most of these protective gear are usually model specific since they are made to fit perfectly across the natural covering. You can buy all of them directly from the seller, or through third party places if they are intended for your notebook, however not all laptop can have a spend on the market. Yet again, thanks for your suggestions.
Nice blog here! Also your website loads up very fast! What host are you using? Can I get your affiliate link to your host? I wish my website loaded up as quickly as yours lol
Your writing style effortlessly draws me in, and I find it nearly impossible to stop reading until I’ve reached the end of your articles. Your ability to make complex subjects engaging is indeed a rare gift. Thank you for sharing your expertise!
Your dedication to sharing knowledge is unmistakable, and your writing style is captivating. Your articles are a pleasure to read, and I consistently come away feeling enriched. Thank you for being a dependable source of inspiration and information.
Your positivity and enthusiasm are undeniably contagious! This article brightened my day and left me feeling inspired. Thank you for sharing your uplifting message and spreading positivity among your readers.
Your writing style effortlessly draws me in, and I find it nearly impossible to stop reading until I’ve reached the end of your articles. Your ability to make complex subjects engaging is indeed a rare gift. Thank you for sharing your expertise!
I want to express my sincere appreciation for this enlightening article. Your unique perspective and well-researched content bring a fresh depth to the subject matter. It’s evident that you’ve invested considerable thought into this, and your ability to convey complex ideas in such a clear and understandable way is truly commendable. Thank you for generously sharing your knowledge and making the learning process enjoyable.
I’ve found a treasure trove of knowledge in your blog. Your dedication to providing trustworthy information is something to admire. Each visit leaves me more enlightened, and I appreciate your consistent reliability.
Your passion and dedication to your craft radiate through every article. Your positive energy is infectious, and it’s evident that you genuinely care about your readers’ experience. Your blog brightens my day!
I must applaud your talent for simplifying complex topics. Your ability to convey intricate ideas in such a relatable manner is admirable. You’ve made learning enjoyable and accessible for many, and I deeply appreciate that.
In a world where trustworthy information is more crucial than ever, your dedication to research and the provision of reliable content is truly commendable. Your commitment to accuracy and transparency shines through in every post. Thank you for being a beacon of reliability in the online realm.
Your enthusiasm for the subject matter shines through every word of this article; it’s infectious! Your commitment to delivering valuable insights is greatly valued, and I eagerly anticipate more of your captivating content. Keep up the exceptional work!
I?m now not sure the place you’re getting your info, however great topic. I must spend some time learning more or understanding more. Thanks for excellent information I was searching for this information for my mission.
I’m genuinely impressed by how effortlessly you distill intricate concepts into easily digestible information. Your writing style not only imparts knowledge but also engages the reader, making the learning experience both enjoyable and memorable. Your passion for sharing your expertise shines through, and for that, I’m deeply grateful.
I must commend your talent for simplifying complex topics. Your ability to convey intricate ideas in such a relatable way is admirable. You’ve made learning enjoyable and accessible for many, and I appreciate that.
Hi, i think that i saw you visited my blog so i got here to ?return the want?.I am attempting to to find issues to enhance my web site!I assume its ok to make use of some of your concepts!!
I am continually impressed by your ability to delve into subjects with grace and clarity. Your articles are both informative and enjoyable to read, a rare combination. Your blog is a valuable resource, and I am sincerely grateful for it.
I’ve found a treasure trove of knowledge in your blog. Your dedication to providing trustworthy information is something to admire. Each visit leaves me more enlightened, and I appreciate your consistent reliability.
I couldn’t agree more with the insightful points you’ve articulated in this article. Your profound knowledge on the subject is evident, and your unique perspective adds an invaluable dimension to the discourse. This is a must-read for anyone interested in this topic.
I wanted to take a moment to express my gratitude for the wealth of invaluable information you consistently provide in your articles. Your blog has become my go-to resource, and I consistently emerge with new knowledge and fresh perspectives. I’m eagerly looking forward to continuing my learning journey through your future posts.
I have not checked in here for a while since I thought it was getting boring, but the last few posts are great quality so I guess I?ll add you back to my daily bloglist. You deserve it my friend 🙂
Your unique approach to addressing challenging subjects is like a breath of fresh air. Your articles stand out with their clarity and grace, making them a pure joy to read. Your blog has now become my go-to source for insightful content.
This article is a true game-changer! Your practical tips and well-thought-out suggestions hold incredible value. I’m eagerly anticipating implementing them. Thank you not only for sharing your expertise but also for making it accessible and easy to apply.
I must applaud your talent for simplifying complex topics. Your ability to convey intricate ideas in such a relatable manner is admirable. You’ve made learning enjoyable and accessible for many, and I deeply appreciate that.
Your enthusiasm for the subject matter shines through every word of this article; it’s infectious! Your commitment to delivering valuable insights is greatly valued, and I eagerly anticipate more of your captivating content. Keep up the exceptional work!
Thanks for any other informative site. Where else could I get that type of information written in such an ideal approach? I have a project that I am simply now working on, and I’ve been at the look out for such info.
Your writing style effortlessly draws me in, and I find it nearly impossible to stop reading until I’ve reached the end of your articles. Your ability to make complex subjects engaging is indeed a rare gift. Thank you for sharing your expertise!
Your dedication to sharing knowledge is unmistakable, and your writing style is captivating. Your articles are a pleasure to read, and I consistently come away feeling enriched. Thank you for being a dependable source of inspiration and information.
I simply wanted to convey how much I’ve gleaned from this article. Your meticulous research and clear explanations make the information accessible to all readers. It’s abundantly clear that you’re committed to providing valuable content.
Your passion and dedication to your craft radiate through every article. Your positive energy is infectious, and it’s evident that you genuinely care about your readers’ experience. Your blog brightens my day!
Your blog has rapidly become my trusted source of inspiration and knowledge. I genuinely appreciate the effort you invest in crafting each article. Your dedication to delivering high-quality content is apparent, and I eagerly await every new post.
I couldn’t agree more with the insightful points you’ve articulated in this article. Your profound knowledge on the subject is evident, and your unique perspective adds an invaluable dimension to the discourse. This is a must-read for anyone interested in this topic.
I’m genuinely impressed by how effortlessly you distill intricate concepts into easily digestible information. Your writing style not only imparts knowledge but also engages the reader, making the learning experience both enjoyable and memorable. Your passion for sharing your expertise shines through, and for that, I’m deeply grateful.
Your writing style effortlessly draws me in, and I find it difficult to stop reading until I reach the end of your articles. Your ability to make complex subjects engaging is a true gift. Thank you for sharing your expertise!
Someone necessarily assist to make seriously posts I would state. That is the very first time I frequented your website page and so far? I surprised with the analysis you made to create this actual post extraordinary. Magnificent task!
Your dedication to sharing knowledge is unmistakable, and your writing style is captivating. Your articles are a pleasure to read, and I consistently come away feeling enriched. Thank you for being a dependable source of inspiration and information.
I simply wanted to convey how much I’ve gleaned from this article. Your meticulous research and clear explanations make the information accessible to all readers. It’s abundantly clear that you’re committed to providing valuable content.
I’m genuinely impressed by how effortlessly you distill intricate concepts into easily digestible information. Your writing style not only imparts knowledge but also engages the reader, making the learning experience both enjoyable and memorable. Your passion for sharing your expertise shines through, and for that, I’m deeply grateful.
I’d like to express my heartfelt appreciation for this enlightening article. Your distinct perspective and meticulously researched content bring a fresh depth to the subject matter. It’s evident that you’ve invested a great deal of thought into this, and your ability to articulate complex ideas in such a clear and comprehensible manner is truly commendable. Thank you for generously sharing your knowledge and making the process of learning so enjoyable.
Your storytelling abilities are nothing short of incredible. Reading this article felt like embarking on an adventure of its own. The vivid descriptions and engaging narrative transported me, and I can’t wait to see where your next story takes us. Thank you for sharing your experiences in such a captivating way.
Your blog is a true gem in the vast expanse of the online world. Your consistent delivery of high-quality content is truly commendable. Thank you for consistently going above and beyond in providing valuable insights. Keep up the fantastic work!
Your enthusiasm for the subject matter radiates through every word of this article; it’s contagious! Your commitment to delivering valuable insights is greatly valued, and I eagerly anticipate more of your captivating content. Keep up the exceptional work!
Your storytelling prowess is nothing short of extraordinary. Reading this article felt like embarking on an adventure of its own. The vivid descriptions and engaging narrative transported me, and I eagerly await to see where your next story takes us. Thank you for sharing your experiences in such a captivating manner.
I wanted to take a moment to express my gratitude for the wealth of invaluable information you consistently provide in your articles. Your blog has become my go-to resource, and I consistently emerge with new knowledge and fresh perspectives. I’m eagerly looking forward to continuing my learning journey through your future posts.
Your blog is a true gem in the vast expanse of the online world. Your consistent delivery of high-quality content is truly commendable. Thank you for consistently going above and beyond in providing valuable insights. Keep up the fantastic work!
In a world where trustworthy information is more crucial than ever, your dedication to research and the provision of reliable content is truly commendable. Your commitment to accuracy and transparency shines through in every post. Thank you for being a beacon of reliability in the online realm.
Your unique approach to addressing challenging subjects is like a breath of fresh air. Your articles stand out with their clarity and grace, making them a pure joy to read. Your blog has now become my go-to source for insightful content.
I’m genuinely impressed by how effortlessly you distill intricate concepts into easily digestible information. Your writing style not only imparts knowledge but also engages the reader, making the learning experience both enjoyable and memorable. Your passion for sharing your expertise is unmistakable, and for that, I am deeply appreciative.
Your blog is a true gem in the vast expanse of the online world. Your consistent delivery of high-quality content is truly commendable. Thank you for consistently going above and beyond in providing valuable insights. Keep up the fantastic work!
Your writing style effortlessly draws me in, and I find it difficult to stop reading until I reach the end of your articles. Your ability to make complex subjects engaging is a true gift. Thank you for sharing your expertise!
Your positivity and enthusiasm are undeniably contagious! This article brightened my day and left me feeling inspired. Thank you for sharing your uplifting message and spreading positivity among your readers.
I’m continually impressed by your ability to dive deep into subjects with grace and clarity. Your articles are both informative and enjoyable to read, a rare combination. Your blog is a valuable resource, and I’m grateful for it.
I wanted to take a moment to express my gratitude for the wealth of invaluable information you consistently provide in your articles. Your blog has become my go-to resource, and I consistently emerge with new knowledge and fresh perspectives. I’m eagerly looking forward to continuing my learning journey through your future posts.
I wish to express my deep gratitude for this enlightening article. Your distinct perspective and meticulously researched content bring fresh depth to the subject matter. It’s evident that you’ve invested a significant amount of thought into this, and your ability to convey complex ideas in such a clear and understandable manner is truly praiseworthy. Thank you for generously sharing your knowledge and making the learning process so enjoyable.
I must applaud your talent for simplifying complex topics. Your ability to convey intricate ideas in such a relatable manner is admirable. You’ve made learning enjoyable and accessible for many, and I deeply appreciate that.
Thanks for your submission. I would also love to opinion that the very first thing you will need to conduct is determine if you really need repairing credit. To do that you simply must get your hands on a copy of your credit profile. That should not be difficult, since government makes it necessary that you are allowed to obtain one no cost copy of the credit report on a yearly basis. You just have to request that from the right people. You can either check out the website for your Federal Trade Commission or contact one of the main credit agencies specifically.
It?s actually a cool and helpful piece of information. I am glad that you shared this useful information with us. Please keep us up to date like this. Thanks for sharing.
This article is absolutely incredible! The author has done a phenomenal job of delivering the information in an captivating and enlightening manner. I can’t thank him enough for providing such priceless insights that have definitely enriched my knowledge in this topic. Kudos to him for creating such a masterpiece!
I wanted to take a moment to express my gratitude for the wealth of invaluable information you consistently provide in your articles. Your blog has become my go-to resource, and I consistently emerge with new knowledge and fresh perspectives. I’m eagerly looking forward to continuing my learning journey through your future posts.
Your blog has rapidly become my trusted source of inspiration and knowledge. I genuinely appreciate the effort you invest in crafting each article. Your dedication to delivering high-quality content is apparent, and I eagerly await every new post.
Your enthusiasm for the subject matter shines through every word of this article; it’s contagious! Your commitment to delivering valuable insights is greatly valued, and I eagerly anticipate more of your captivating content. Keep up the exceptional work!
I wanted to take a moment to express my gratitude for the wealth of invaluable information you consistently provide in your articles. Your blog has become my go-to resource, and I consistently emerge with new knowledge and fresh perspectives. I’m eagerly looking forward to continuing my learning journey through your future posts.
Hi there very nice web site!! Guy .. Excellent .. Superb .. I’ll bookmark your site and take the feeds additionally?I’m satisfied to seek out a lot of useful information here in the submit, we need work out extra strategies in this regard, thanks for sharing. . . . . .
Amazing blog! Is your theme custom made or did you download it from somewhere? A design like yours with a few simple tweeks would really make my blog jump out. Please let me know where you got your theme. With thanks
Your passion and dedication to your craft shine brightly through every article. Your positive energy is contagious, and it’s clear you genuinely care about your readers’ experience. Your blog brightens my day!
I am continually impressed by your ability to delve into subjects with grace and clarity. Your articles are both informative and enjoyable to read, a rare combination. Your blog is a valuable resource, and I am sincerely grateful for it.
I wanted to take a moment to express my gratitude for the wealth of invaluable information you consistently provide in your articles. Your blog has become my go-to resource, and I consistently emerge with new knowledge and fresh perspectives. I’m eagerly looking forward to continuing my learning journey through your future posts.
Another thing I have really noticed is the fact for many people, poor credit is the result of circumstances outside of their control. Such as they may have already been saddled with illness and because of this they have large bills going to collections. Maybe it’s due to a work loss or the inability to go to work. Sometimes separation and divorce can really send the financial situation in an opposite direction. Thank you for sharing your thinking on this site.
Pretty portion of content. I just stumbled upon your website and in accession capital to say that I acquire actually enjoyed account your weblog posts. Anyway I will be subscribing in your feeds and even I achievement you access constantly fast.
In a world where trustworthy information is more important than ever, your commitment to research and providing reliable content is truly commendable. Your dedication to accuracy and transparency is evident in every post. Thank you for being a beacon of reliability in the online world.
Your enthusiasm for the subject matter shines through every word of this article; it’s infectious! Your commitment to delivering valuable insights is greatly valued, and I eagerly anticipate more of your captivating content. Keep up the exceptional work!
Your unique approach to addressing challenging subjects is like a breath of fresh air. Your articles stand out with their clarity and grace, making them a pure joy to read. Your blog has now become my go-to source for insightful content.
Your passion and dedication to your craft radiate through every article. Your positive energy is infectious, and it’s evident that you genuinely care about your readers’ experience. Your blog brightens my day!
Your blog has quickly become my trusted source of inspiration and knowledge. I genuinely appreciate the effort you put into crafting each article. Your dedication to delivering high-quality content is evident, and I look forward to every new post.
In a world where trustworthy information is more crucial than ever, your dedication to research and the provision of reliable content is truly commendable. Your commitment to accuracy and transparency shines through in every post. Thank you for being a beacon of reliability in the online realm.
Your blog has rapidly become my trusted source of inspiration and knowledge. I genuinely appreciate the effort you invest in crafting each article. Your dedication to delivering high-quality content is apparent, and I eagerly await every new post.
Your dedication to sharing knowledge is unmistakable, and your writing style is captivating. Your articles are a pleasure to read, and I consistently come away feeling enriched. Thank you for being a dependable source of inspiration and information.
Boostaro is a dietary supplement designed specifically for men who suffer from health issues. https://boostarobuynow.us/
I would like to thank you for the efforts you have put in writing this site. I’m hoping the same high-grade web site post from you in the upcoming as well. In fact your creative writing abilities has inspired me to get my own blog now. Really the blogging is spreading its wings quickly. Your write up is a great example of it.
This article resonated with me on a personal level. Your ability to emotionally connect with your audience is truly commendable. Your words are not only informative but also heartwarming. Thank you for sharing your insights.
Thanks for any other great post. The place else may anybody get that kind of info in such a perfect method of writing? I have a presentation next week, and I am on the search for such info.
I am continually impressed by your ability to delve into subjects with grace and clarity. Your articles are both informative and enjoyable to read, a rare combination. Your blog is a valuable resource, and I am sincerely grateful for it.
Your storytelling prowess is nothing short of extraordinary. Reading this article felt like embarking on an adventure of its own. The vivid descriptions and engaging narrative transported me, and I eagerly await to see where your next story takes us. Thank you for sharing your experiences in such a captivating manner.
Your blog has rapidly become my trusted source of inspiration and knowledge. I genuinely appreciate the effort you invest in crafting each article. Your dedication to delivering high-quality content is apparent, and I eagerly await every new post.
I am continually impressed by your ability to delve into subjects with grace and clarity. Your articles are both informative and enjoyable to read, a rare combination. Your blog is a valuable resource, and I am sincerely grateful for it.
Hello! This is my first visit to your blog! We are a team of volunteers and starting a new initiative in a community in the same niche. Your blog provided us beneficial information to work on. You have done a outstanding job!
Hi! Someone in my Facebook group shared this site with us so I came to give it a look. I’m definitely loving the information. I’m bookmarking and will be tweeting this to my followers! Wonderful blog and great design.
Your storytelling prowess is nothing short of extraordinary. Reading this article felt like embarking on an adventure of its own. The vivid descriptions and engaging narrative transported me, and I eagerly await to see where your next story takes us. Thank you for sharing your experiences in such a captivating manner.
I simply wanted to convey how much I’ve gleaned from this article. Your meticulous research and clear explanations make the information accessible to all readers. It’s abundantly clear that you’re committed to providing valuable content.
I just wanted to express how much I’ve learned from this article. Your meticulous research and clear explanations make the information accessible to all readers. It’s evident that you’re dedicated to providing valuable content.
Informative and concise! Your blog beautifully explains complex concepts in simple terms, making it a valuable resource for readers seeking clarity. Well done! Natural stone wholesaler in India
Awesome! Its genuinely remarkable post, I have got much clear idea regarding from this post
Experience thrills, challenges, and epic victories Lucky Cola